Monday, November 30, 2009

Christmas Treats, Part I

Well, hello there!  I know...it's been a few days.  I managed to catch my girls' cold after Thanksgiving, and let's just say anything I did was minimal. ;-)  Thankfully, I'm feeling a little better today. :)

With Christmas approaching, I've decided to share a series of handmade gift ideas!  We all need some ideas, right?  Let's get started then! :)

Day 1
Little Chocolate-Lover's Tin:  


I just love how a little extra 'somethin' spices up a gift, don't you?

I make one of these every year, changing the DSP to SU's current C'mas selection.  This is Cocoa Prints Specialty from the Holiday mini -- and ooooh, baby!  It's niiiiice.  The picture doesn't do it justice, really. There are more prints involved in the pack, too (some of them have pretty white flocking!!)

This is simply a Gift Card tin ($1), some Hershey's Nuggets, Designer Paper, and ribbon!

You could change up the DSP & colors for any occasion.  Make it more elegant, or more fun!  Just Because, Birthdays, Valentine's Day...you name it!! :)

What chocolate-lover wouldn't love this gift?!!

The Small Print (All Stampin' Up!)
Paper: Cocoa Prints Specialty DSP
Accessories:  Real Red 5/8" grosgrain, Sticky strip
Other: $1 tin, Hershey's Nuggets


Thanks for stopping by, and have a GREAT day! :)
Crystal
Thursday, November 26, 2009

Happy Thanksgiving!!

When I wrote the title to my post yesterday (Give Thanks), this song came to mind, and I had an idea!  So, with the help of "google"...I found something to share with you today. :)

But before I get to that, I want to take the time to Give Thanks.

Thank you Lord, for health.  For a warm home and plenty of food.  For a loving and wonderful husband, whom I sometimes wonder if I deserve. ;-)  For beautiful, spirited daughters who mean the world to me.  For family I hold dear to my heart. For friends...new and old.  For friends made through my love of stamping, for sweet & loyal customers. For blog readers! (wow, never thought I'd see the day! lol)...

...I'll continue in private - you go get that turkey in the oven! :)

I hope you can find time today to Give Thanks.
This is my first time with embedding a video...sure hope it works!


Thanks for stopping by, and have a GREAT day! :)
Crystal
Wednesday, November 25, 2009

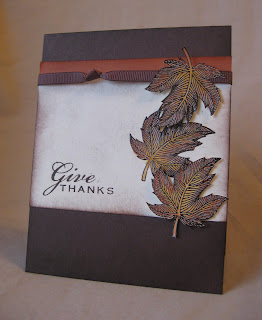
Give Thanks

Tomorrow is Thanksgiving already, can you believe it?

I've decided to post this card today instead of tomorrow...
Because I wanted to start start the mood today...to really take time to reflect on all that I am thankful for.
Will you do the same? :)


I'm really disappointed with this pic...it really doesn't capture the beautiful colors on the leaves, and washes out the very vanilla cardstock color - it's not white, really! :(

Here's a try at a closeup of the leaves, at least...they're embossed, then colored...


Stay tuned - tomorrow I've got a special treat for you!
Please stop by & & check it out! :)

The Small Print (All Stampin' Up)

Stamps: Autumn Splendor, Holiday Best
Cardstock: Chocolate Chip, Really Rust, Very Vanilla
Ink: Chocolate Chip (craft & classic), Really Rust
Accessories: Stampin Sponges, Clear EP, Heat tool, Aquapainter, SU markers, Choc chip ribbon, Dimensionals
Technique: Embossing, Watercoloring


Thanks for stopping by, and have a GREAT day! :)
Crystal

Tuesday, November 24, 2009

Autumn Tree, Simplified

Yesterday, I showed you a Thumping Tree HERE, and promised to show you a simplified version today.

So here it is!  I think you can see the thumping detail even better on this one!


I "thumped" the tree image with SU markers, stamped, then moved a bit of the color around with an Aquapainter.  You could leave it as is after thumping, or move the color around like I did.

The background is merely spritzed with color (SU marker & color spritzer), and the edges sponged.

See, I told you it could be simplified! :)
Well, what do you think?

The Small Print (All Stampin' Up)
Stamps: Lovely As A Tree
Cardstock: Old Olive, Chocolate Chip, Naturals Ivory
Ink: Basic Brown
Accessories: Markers, Color Spritzer, Aquapainter, Sponges
Technique: Thumping


Thanks for stopping by, and have a GREAT day! :)
Crystal

Monday, November 23, 2009

Stampin' Up! Extravaganza!

STARTS TODAY!!!
  HUGE  STAMPIN' UP!  SAVINGS!


SAVE UP TO 50%
Get amazing discounts - up to 50 percent off on over 40 products and product bundles!

SALE ENDS NOV. 30!
The best Stamping Black Friday sales running the entire week!
November 23-30, 2009


Click to view pics of all the specials!

NOTE:  If you go online, only pay attention to the "preferred" price.
 
The "Regular price" listed is the sale price you'd get if you DON'T go through me.
I can email you with full information...
...items $40 some down to $20 some!!

With all the great "stuff" going on right now, you could REALLY clean up! :)

*30-50% savings on Holiday Extravaganza items
*FREE Décor elements when you add enough items from the Holiday Gift Giving Guide to your order
*$10 Winter Mini Item if your order passes $250
*1/2 Price My Digital Studio if your order passes $400
*Hostess sets
*Hostess Dollars

CONTACT ME to host a catalog show or order this week!
 Get your holiday shopping all finished before December!

Please let me know by 9am (PST) on Monday, November 30th
if you'd like to place an order & qualify for these great savings! :)

Another Autumn Tree

Sorry for the blogging hiatus...

We were out of town for a few days last week, so I wasn't able to get my daily computer dose in. ;-)

I'm back now, with (hopefully) a treat for you every day this week! :)  The first, is a card I made with one of my GO-TO sets:  "Lovely As A Tree".

I'll bet you're wondering how I made those tree leaves sooo beautiful, am I right? ;-)


By using a technique called "thumping."  SERIOUSLY.
Using my Stampin' Up markers.
Let me know if you'd like a tutorial.

A little sponging here & there, and voila!  You have your card!
Complete with top note die cut from SU's Sizzix die!
I love how it could really be a card for most any occasion! :)

Tomorrow, I'll show you a toned-down, simplified version.  I know...how could it get any more simplified?!!  lol...you'll see. :)

The Small Print (All Stampin' Up)
Stamps: Lovely As A Tree, Sincere Salutations, Linen BG
Cardstock: Old Olive, Chocolate Chip, Very Vanilla
Ink: Basic Brown
Accessories: SU markers, Aquapainter, Sponges, Sizzix, Top Note Die, Chocolate chip ribbon
Technique: Thumping, Sponging


Thanks for stopping by, and have a GREAT day! :)
Crystal

Wednesday, November 18, 2009

Wednesday Wit

I saw this the other day in the Sunday Comics & laughed out loud while clipping it out.

I just had to share.

It sounds...ahem...a little familiar! lol

(To view larger, click pic)


Does anyone else find the irony in this comic hilarious??!!  ha ha ha... LOVE IT!

Thanks for stopping by, and have a GREAT day! :)
Crystal

Tuesday, November 17, 2009

I'm baaack...with some SPARKLE!!

Hey there folks,

I'm baaaa--aak! :)  We had a crazy-busy weekend around here, and I decided not to add one more thing by blogging.  It can be a time-stealer!

Anyhow...here's another pretty, SPARKLY card I made recently.  I used a new set from the mini catalog (see sidebar), "Serene Snowflakes"....love it! :)

I used the dryer sheet technique to make it that way...look up close (click), it's sparkly...AND fuzzy! lol :)  What an interesting combo, huh?  Well, IRL it looks sooo pretty! :)  Why ELSE would I keep a ziplock of used dryer sheets? lol. 


The Small Print (All SU except where noted)
Stamps: Serene Snowflake
Cardstock: Bermuda Bay, Whisper White
Ink: Bermuda Bay

Accessories: Dazzling diamonds glitter, Bermuda Bay ribbon, SNAIL
Other: Spray adhesive, Dryer sheet

Technique: Generation stamping, Dryer sheet


Thanks for stopping by, and have a GREAT day! :)
Crystal

Friday, November 13, 2009

Scenic Season, Part 2

Okay, here's the second item to show you using Scenic Season.
When I first saw this set, I *knew* I wanted to emboss it in silver.
So of course, that's what I did! :)


It's very simple and serene.

My first choice would be a silver ribbon, but I don't have any. So, I used Stampin' Up's whisper white taffeta ribbon.  Have you seen all our taffeta ribbons?  Ohhhh, baby - love 'em!! 

Here's a view from the side, with the sun on it, so you can see it IS actually embossed. ;-)


The Small Print (All Stampin' Up!)
Stamps: Scenic Season
Cardstock: Whisper White, Brushed Silver
Ink: Versamark
Accessories: Embossing buddy, Silver EP, Heat tool, White taffeta, Dimensionals

Technique: Embossing

Thanks for stopping by, and have a GREAT day! :)
Crystal

Thursday, November 12, 2009

Scenic Season, Part 1

This is the first of a few to show you using the new Stampin' Up!
set called "Scenic Season".  I love the simple elegance of this set.

I used SU's Sizzix Bigz Scallop Square die for the base for something a little "different".

I'm not thrilled with it as the base for THIS particular card, but but I'll share it anyways, and try again on a different card - I know it could look great! :)

At first glance, you cannot see the beautiful SHIMMER on this! :(
Click on the picture...you should be able to see it closer up...see the light sparkly shimmer?!

I spritzed it with a homemade concoction made from the NEW shimmer paint in Stampin' Up's mini catalog (the red one on your right)!  Sooo fun.  I've been wanting to spray everything I make! lol  Oh, if only you could see this IRL.  It's gorgeous!! 

Maybe next time, I'd make the ribbon at the top into a bow, instead of the plain knot...but other than that...I like it! :)

I used a technique called "masking" to make the moon. :)


The Small Print (All Stampin' Up!)
Stamps: Scenic Season
Cardstock: Night of Navy, Always Artichoke, Naturals White
Ink: Always Artichoke, Brocade Blue, Old Olive? (last two for sponging)
Accessories: Circle punch, Stampin' Sponges, SU Sizzix Scalloped Square, Night Of Navy ribbon

Technique: Masking

Thanks for stopping by, and have a GREAT day! :)
Crystal

Wednesday, November 11, 2009

Clean, Simple...Christmas

Ahhhhh....CLEAN AND SIMPLE.
Just in case you're wondering, that's what the "CAS"
means in my labels. :)

I *heart* this card.  So simple.
I'm itching to add a little dazzling diamonds to it...we'll see. ;-)

This is another I made for display at my Open House...

Anyways, I know this is a CHRISTMAS card, and it's not yet
Christmas, but I wanted to show you...because this card is made
with the same stamp set (Autumn Days) that I used in my last post!
Remember, that was a FALL card! :)

I just love versatility! :)


The Small Print (All Stampin' Up!)
Stamps: Autumn Days, Christmas Greetings
Cardstock: Very Vanilla, Old Olive, Chocolate Chip

Ink: Chocolate Chip
Accessories: Chocolate Chip & Old Olive markers, Scallop and circle punches, Chocolate chip gg ribbon, Dimensionals, Stampamajig


Thanks for stopping by, and have a GREAT day!
Crystal

Tuesday, November 10, 2009

A Fall Pheasant

Okay, it's really sad that I don't know this for sure,
but I'm thinking the main image in this card is called a pheasant?
Ha ha...obviously we're not hunters in this family. ;-)

Here's another card I made to have on display at my Open House...


Used several stamps from the SU set: "Autumn Days"...

Actually started out CASEing this great card HERE,
but decided to change a few things.

Well, that's all for today - amazingly short post! ;-)

The Small Print (All Stampin' Up!)
Stamps: Autumn Days, Teeny Tiny Wishes
Cardstock: Soft Suede, Dusty Durango, Very Vanilla

Ink:  Soft Suede, More Mustard, Dusty Durango
Accessories: Soft Suede ribbon, Stampamajig, Dimensionals


 Thanks for stopping by, and have a GREAT day! :)
Crystal

Monday, November 9, 2009

Makeover Monday

Ha ha, not for me --- I wish!  How fun would THAT be?! :)

A makeover of the crafting variety....still fun! ;-)

Purchase journal at the dollar section of popular craft store.
Decide the cover is just NOT what you're looking for.

Especially if it's for the mom of an 11 month old
(my recent Stampin' Up Hostess).
You'll see why in a minute. :)

Cover said journal with super-cute designer paper.
(Pawsitively Prints from Stampin' Up!)

Much better, but still a little boring...no?

Okay...I'll add a little more. :)

Okay, how cute is THAT?!!
I made a die-cut out of Stampin' Up!'s
Sizzix Build A Bear collection!  Designer clothes & all! ;-)

I also made a matching pen but forgot to include it in the pic - you'll just have to imagine the super cuteness.

I wish I had a notebook to write down all the things I want to remember about my kiddos...the funny things they say & do...you know, the daily stuff that you may not remember otherwise.
 The stuff that comes *after* the baby book. ;-)

Well, that's all for today...
I hope I've inspired you to give a makeover gift of your own! :)

Thanks for stopping by, and have a GREAT day! :)
Crystal

Saturday, November 7, 2009

A Thankful Heart

I was driving to demo at a Stampin' Up party this morning, and something small made me think a little deeper.  Something so insignificant in life, but I'm so glad I noticed, because it led to an idea.

I have vowed to find at least ONE thing to be thankful for, every day this month.

What happened??!!  You might be asking.
Well, like I said, it's small...but here's what happened:

"YAY!!  No more detour on the way to _____!!"  Is what passed through my mind as I drove.  We only go to that town (20-25 min away) maybe once a week, but I was just so grateful that the construction was done, and no more detour to avoid. :)

Seems a crazy thing to be thankful for.
But what it led me to is what I'm most excited to tell you about!

With Thanksgiving approaching, I am reminded of the sometimes seemingly rote "what are you thankful for this year" tradition many people ask at their Thanksgiving dinners.  Why is it that we only think of it on that special day?  Don't get me wrong...this is a good thing, and I'm glad there IS a special day to remember.  My question is more "why does it take a special day?"

How much better would each day be if we found at least ONE thing to be thankful for?

So now, will you do this with me?  Don't worry, I won't hunt you down or anything, lol.  This is a personal heart-thing...you don't even have to tell me you're doing it! :)

I think that one month could lead to a lifetime of thankful hearts! :)

Thanks for stopping by, and have a GREAT day! :)
Crystal

Friday, November 6, 2009

Fall Leaves...to stay!

Remember a few posts ago...HERE
I was lamenting the fact that the beautiful Autumn
leaves were falling to the ground?

Well, I found a way around that. ;-)

I made a card - a tree card!
WITH the leaves on...well mostly, anyways. ;-)
Granted, it's NOT as beautiful as the real thing, but it'll do. :)

A view from the side...do you see a little something extra?:


How bout if I go a little closer...do you see the sparkle?  FUN!


I embossed the craft ink with Irridescent Ice Embossing powder (SU) here & there.
Gives it a little somethin' extra dontcha think? :)

Oh, you're not a ribbon kind of person?
No problem...I made for you, too!
I also omitted the stamping around the edges, and sponged a little more. :)


The Small Print (All Stampin' Up!)
Stamps: Branch Out
Cardstock: Soft Suede, Dusty Durango, Very Vanilla
Ink: Soft Suede, Dusty Durango, Earth Elements Craft inks
Accessories: Irridescent Ice EP, Heat tool, Dimensionals, Soft suede ribbon, Stampin' Sponge
Technique: Embossing

Which one do YOU like best?

Thanks for stopping by, and have a GREAT day! :)
Crystal

Thursday, November 5, 2009

A Treat...and a Tutorial!!


My first ever tutorial...I'm so excited!
Since it IS my first...
Disclaimer: this will not be perfect by any means! lol

I made a few thank you treats for some stamping friends of mine. :)

Let's get started, shall we?

Step 1 : Score a 4 x 6.5 pc. soft suede cardstock at 3.25 & fold
Step 2 : Place treat into small cello bag and fold over,
apply SNAIL adhesive to folded flap & put inside folded cardstock.


Step 3 : Tie treat folder closed with ribbon
(sorry about pic - the ribbon DOES match IRL)


Step 4 : Punch out 3 circles from pumpkin pie cardstock


Step 5 : Apply pumpkin pie ink to edges of punched circles with sponge daubers


Step 6 : Create a vine - wrap a thin strip of cardstock around small round object


Steps 7-9 : Adhere the 3 circles together to form a pumpkin
Stamp "thank you" on center
Add stems and vines


Step 10 : Mount pumpkins onto layers of cardstock with dimensionals


LAST STEP : Mount onto soft suede treat holder - voila!


The Small Print: ALL Stampin Up (except for Peanut Butter cup, lol)
Stamps:
Family Phrases

Base: 4 x 6.5 pc. cardstock (Soft Suede)
Other Cardstock: Old Olive, Confetti White, Pumpkin Pie, Always Artichoke
Ink: Pumpkin Pie, Soft Suede
Accessories: Ribbon (Soft Suede), 1.25" circle punch, Sponge dauber, SNAIL, Dimensionals, Small cello bags
Other: Reeses Peanut Butter Cup treat

I hope you enjoyed my first ever Tutorial! :)
Thanks for stopping by, and have a GREAT day! :)
Crystal

Tuesday, November 3, 2009

Gettin' Punchy!

Here's a card I recently made that I just *LOVE*!!
I can see myself making a TON of them!  :)

I just love finding new ways to use things. This is one case where the phrase I grew up with: "use things for their intended purpose" does NOT apply! lol

If you click on the Holiday Mini catalog on my sidebar, you'll see what I mean.  Go to page 24-25. It's an ornament punch made to coordinate with the new Christmas set: "Delightful Decorations"!  I saw this collaboration and said...I want it! :)

ANYWHO....I made this punch to be a vase for these beautiful flowers from the stamp set "Pocket Silhouettes".  The stamp was colored with my Old Olive and Rich Razzleberry markers. I also sponged the edges of the vase and card base for depth, and popped the vase up on dimensionals.


Well, what do you think?

The Small Print (All Stampin' Up)
Stamps: Pocket Silhouettes
Paper: Old Olive, Rich Razzleberry, and Whisper White cardstocks
Ink: Old Olive
Accessories: Olive & Razzleberry markers, Stampin Sponges, Ornament Punch, dimensionals


Thanks for stopping by, and have a great day! :)
Crystal