Thursday, February 25, 2010

Matchy-Matchy, Baby!

Remember my last post HERE about Sweet Pea baby shower invitations?

I told you I'd post the card I made to go with my gift...

I asked you to guess when you thought I made it, but no one did.  No one even tried!  Good thing I'm not taking it personally, lol! ;-)

Well, following my...ahem...tradition (this post), I made the card within an hour of arrival at the shower. ;-)  Here's the great part...it only took me about 7 minutes from start to finish! :)

As you can see (if you clicked above to view invite)...it MATCHES!
Just enough difference to know it's not the invitation, just enough to make it match! :)


See the sparkle on the celery matting around the sweet pea?  Ahhh...one of my fave techniques for a CAS card! :)

Well, what do you think?

The Small Print (All Stampin' Up)
Stamp: Event Full
Cardstock: Certainly Celery, Whisper White
Ink: Black Stazon, Certainly Celery

Accessories: Blender pen, Embossing folder, 2way glue, Dazzling diamonds

Thanks for stopping by, and have a GREAT day!
Crystal

Tuesday, February 23, 2010

Baby, Baby, Baby...

....everyone's havin' babies! :-)

I recently co-hosted another baby shower for a gal in our small group.  She doesn't know whether it's a girl or boy, so we tried to be neutral in our color/image choice for the invitation.

I suggested this stamp that I just *ADORE* for baby cards...

Now, I will warn you...this is not a new stamp.  It's from a retired Stampin' Up set called "Event Full"...and this is my absolute favorite stamp from that set:


Oh, the picture can't even do it justice!!  It's such a little cutie! :)

Soon, I'll post the card I made to give her with her shower gift.  Any guesses as to when I actually made the card for the shower? ;-)

The Small Print (All Stampin' Up!)
Stamps: Event Full
Ink: Black Stazon, Certainly Celery
Cardstock: Certainly Celery, White
Accessories: Polka dot embossing folder, Celery ribbon, Dimensionals, Blender pen

Well, what do you think?

Thanks for stopping by, and have a GREAT day! :)
Crystal

Friday, February 19, 2010

Baby Card...and Procrastination

Are all cardmakers like this, or is it just ME that procrastinates?

I've had the gift for oh...probably 3 weeks or so.
Yet, when do I make the card?

Same day it's needed, of course! ;-)

Here's a simple card you can make in a hurry. Though this one is for a baby girl gift, all you would have to do is change the sentiment and it could be used for almost any occasion! :-)


The butterflies all came from ONE SU Sizzix embosslit, "Beautiful Wings"....it's in the Occasions mini! :-)

The "Small Wonder" sentiment is part of a FREE stamp set you can earn during Sale-A-Bration!

How did I attach them to card base?  With our mini glue dots, of course!  Love how it leaves the rest of the butterfly free, so you can lift wings upward a bit...make them look like they're really flying! :-)

Well, what do you think?

The Small Print (All Stampin' Up)
Stamps: Whimsical Words
Cardstock: Whisper White, Pretty in Pink
Ink: Pretty in Pink
Accessories: Beautiful Wings embosslit, Mini glue dots

Thanks for stopping by, and have a GREAT day! :)
Crystal

Tuesday, February 16, 2010

Love You Much

So...one more Valentine's post.  Last one. ;-)
Remember, my computer was acting up during Valentine's weekend, so I couldn't show you this stuff, but I still want to! :)

Here's the Valentine I made for my honey.
He's the BEST hubby...honestly, sometimes I wonder what I did to deserve such a great guy!!


I know, I know.  It's PINK.  But the bordering dark Chocolate chip makes up for it, right? lol   I couldn't resist when I saw this DSP scrap in my papers...it's got lovebirds on it....it's PERFECT! ;-)

The paper on this easel card is a retired DSP from Stampin' Up! called "Candy Lane".  Pretty simple card to make, with WOW results.  The sentiment is from "Well Scripted" in the Occasions catalog, the small pink heart is a punch in same catalog, and the pretty scalloped border you see is SU's scallop trim border -- you can get it for FREE during SAB!!  :)

Well, what do you think?

The Small Print
Stamps: Well Scripted
Ink: Chocolate Chip

Paper/Cardstock: Candy Lane DSP, Chocolate Chip, Pirouette Pink, White
Accessories: Small heart punch, Scalloped trim punch, dimensional, sticky strip, Paper piercer
Technique: Easel card


Thanks for stopping by, and have a GREAT day! :)
Crystal

Monday, February 15, 2010

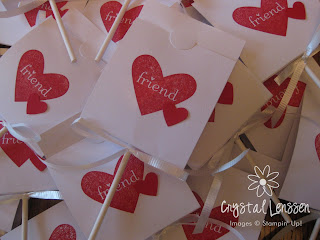
Valentine's Treat Tutorial

Armed with a cuppa joe and some Valentine's chocolate, (wink)
here I am with your Valentine's Treat Tutorial!
My computer's behaving for the moment, so I'm hoping to whip this out in no time! :)

Click HERE to see the finished product post first!

Are you ready?
OK, let's go!

Step 1:
Cut cardstock to 6 1/2" x 2 5/8"
 Score at 2 3/4" and 3 1/4"

Step 2:
Punch hole in center of middle panel
(I used my good 'ole Stampin' Up Tool kit)

Step 3:
Crease the score lines

Step 4
Punch top flap with slit punch.
Here's what you want it to be able to do:

Step 5:
Decorate as desired.
(flaps untucked and laid out flat)
On backside, daughter stamped "To/From" and wrote names.

Step 6:
Insert suckers.

Step 7:
Tuck bottom flap under top flap.
We added white curly ribbon at this point & tied into a bow. :)

Step 8:
Stand back and sigh with a smile.
Done! :)


This is a very kid-friendly project...
I only cut, scored, and punched.

3 year old inserted the suckers (gotta help!) :)
5 year old did the rest...this was for HER class, afterall! :)
(stamping, punching hearts, gluing, writing names, assembling)

NOTE: Measure your packaging before attempting.
  You may need to alter cardstock width (up to 3"?).
I like my treats to be snug...not so much cardstock overwhelming the project. :)

Well, what do you think?
 My 2nd Tutorial ever...may have to switch to video some day! lol

The Small Print:
Stamps: I {Heart} Hearts
Ink: Real Red
Cardstock: White
Accessories: SU tool kit, slit punch, Small heart punch, 2 way glue pen
Other: Suckers, Curling ribbon


Thanks for stopping by, and have a GREAT day! :)
Crystal

Sunday, February 14, 2010

HAPPY Valentine's Day!

Hello and Happy Valentine's Day to you all! :)

As promised, here's the project my daughters and I worked on...
The tutorial will have to wait because our computer is acting up.
Not sure if it's the computer, the internet, or BOTH.  Probably both. ;-)

Took forever for me to even get just this short post on here! lol


Oh, you were looking for the project, not my daughters? lol ;-) 
Okay...here it is:


Hoping to post the tutorial tomorrow...gonna clear some cookies (the computer kind)...hoping it's all good after that! :)

Back tomorrow with more info! :)
***EDITED TO ADD: Here's a link to the TUTORIAL***

Thanks for stopping by, and have a GREAT day!
Crystal

Friday, February 12, 2010

Little Suzy Homemaker

Sorry for the hiatus.  Life gets in the way sometimes...but that's as it should be, don't you think?  There has to be a balance, especially if you're feeling under the weather. ;-)

Yesterday was a WONDERFUL day.  It was a bit dreary outside, but the house was bursting with the sunshine in my heart. :)   Over my cold enough that I could function, I got just a few (wink) things done:


It was one of those days I felt like "Little Suzy Homemaker" and loved every minute of it.  Most days, that is not what it feels like, KWIM? ;-)

Besides the normal de-cluttering (which turned into a mess again), I did laundry, baked these chocolate chip cookies for my daughter's class, and had a sweet time making Valentines with my daughters....for hours. ;-)

I could show you pictures of folded clothes, but I won't.
I could show you pictures of the valentines, but I'll save that for tomorrow. :)
I could show you what I have to do around here to preserve the best cookies...and I WILL.


I had painstakingly researched* the night before, & collaborated the information.  Baked, then picked out the best ones to bring to her class...because, let's be honest here:  I wanted them to think that "A's mom makes the BEST cookies!" lol 

I knew when my hubby came home, he'd see them, and want them. ;-)  I also knew I'd be busy with the girls and unable to warn him.  So...being the efficient person that I am, I put signs on the cookies! :)

They look pretty straightforward, don't you think?

FAST FORWARD...

When hubby came home & found me, he was eating a cookie. ;-)
I laughed and said "Did you like my little signs?"

Do you know what he said??
"What signs?"

I laughed again, because...SERIOUSLY?  He has got to be kidding.
Oh, he wasn't.

Apparently, he didn't have his glasses on, and is that blind.
Acht...good thing I love that man, my Valentine! :)


*NOTE: Yes, I've made cc cookies before...it had just been quite awhile, and remembered the past few times, them going 'flat'. I have this idea of perfect cookies in my mind. Guess what? Ohhhh, they are!!

 Please come back tomorrow to see the Valentines my daughters and I made...and maybe a tutorial on them, too! :)

Thanks for stopping by, and have a GREAT day! :)
Crystal