Showing posts with label Fall. Show all posts

Thursday, November 8, 2012

A "Corny" Thank You

Love it when I can use a pun in my title. ;)
Today's project is NOT Christmas....it's more Fall-ish. Is that a word? Fall-ish??

Anywho...here's another sample I made to have on display at my Annual Holiday Party in October...
I made this card using another stamp set / matching framelits combo from the Holiday catalog. :)

I used the Perfectly Preserved stamp set, and the Cannery Set framelit dies. Not only was I able to use a matching stamp set and framelit dies, but...I also used the coordinating Orchard Harvest Designer paper! I really really like this paper. So much, I'm thinking about getting more before the catalog is gone in December. :)

Did you know you can purchase the stamp set and coordinating framelit die set as a bundle for 15% off? YES!! You CAN!!! :)

Anyways...it's pretty self-explanatory, but...the card base is Crumb Cake, and the designer paper as mentioned before, is Orchard Harvest. I inked the corn husks with my Lucky Limeade marker, and the corn with a combination of So Saffron and More Mustard markers. Love! :)  I then cut it out using the coordinating framelits dies! :)

The "Thank You" tag is stamped in Lucky Limeade from the Itty Bitty Banners stamp set, and cut out with the Bitty Banners framelits die, then connected to the layers & bow of linen thread for that rustic country look. :)

*NOTE: All stamp set links lead to wood mount stamps, but are also available in clear mount for a lower price. :)

Well, what do you think?

Thanks so much for stopping by, and have a GREAT day! :)
Crystal

Friday, December 16, 2011

Thank You Treat

Quick post today...

Thought I'd share the Open House thank you's I made to include in the gals' order bags.


Soft Suede and Very Vanilla cardstock
Spice Cake Designer Paper
Easy Events stamp set
Aquapainter & Ink pad lids
Pool Party ruffled ribbon


Would you like to see the inside??
OK. :)


I always like to include some kind of little treat. :)


Well, what do you think?

Thanks so much for stopping by, and have a GREAT day! :)
Crystal

Tuesday, December 13, 2011

Open House Treat!

So, a week after I debuted at my first Craft Show, I held my Annual (Stampin' Up) Holiday Open House at my home. Crazy? YES.

Funny thing though...usually I stress out about the Annual Open House. It's interesting what insane craft mode for 3 weeks straight will do to your psyche. After that, I thought...Open House? Bahhh...no biggie! :)

So where I'm usually making tons and tons of new samples, this year I limited myself to 24-ish, combined with "older" samples that were still legit (not retired product). Kind of nice...however, 24-ish samples (cards AND gifty stuff) done in a week...still a little crazy. ;-)

I always enjoy my time with the ladies who come...some of them I don't see but 1-2 times a year, so it's exciting to see them again and catch up.

In the past, I've offered a couple of free make n takes, and this year was no exception.

I had the card figured out, but had the gifty-item narrowed down to three items. The first, I'm just WAY too embarrassed to show you, lol. It was one of those things that you have this idea, and when it comes to fruition - yeah, not as lovely as you pictured it. ;-)

Here's the runner up (didn't make the cut):
Keep in mind the Open House was on NOVEMBER 19th (wink)


I really liked it, but yet...it just wasn't quite right. It's a rather large scallop die for the Big Shot. It needed two pieces cut, scored at a certain point, and adhered together - I felt it wasn't very easy to line up the two at the bottom.


Instead, I wanted to make something which maybe had more uses, and came up with THIS:

First, it uses the Sizzix Two Tags Die. You get two different cut outs from one die - more for your money! :)  Anywho...whereas the above project is DEFINITELY pumpkin-y, I felt like this one could be changed up to reflect different holidays/birthdays/baby shower/wedding shower, etc. So that's why I chose this project...plus it was a little easier to put together. :)

See the texture?  It's the Vintage Wallpaper embossing folder. And the leaves? Little Leaves sizzlit.

Yes, we used a lot of BIG SHOT. :)

The ribbon is our 5/8" chocolate satin ribbon, tied with our hemp twine. The stamped sentiment is from Grateful Greetings, which I punched out with the large oval, and backed with the scallop oval punch.

Wanna see what's in it?? OK. :)


What ELSE could it be in November? ;-)

Stampin' Up's small cello bags held the treat nicely. :)


Well, what do you think? Try to look beyond the fact that it is now December. ;-)

Thanks so much for stopping by, and have a GREAT day! :)
Crystal

Friday, November 12, 2010

Punchy Pumpkins!

Nope, they're pumpkins that are acting silly (wink)....

They're pumpkins made from punches!
Here's a couple of cards I made yesterday to add to my Etsy Store:


I've admitted to you before that I'm a paper hoarder, right?  Well, I've been trying to get over that and use some of my older (retired) designer paper --- so here's 2 cards using retired DSP called "Autumn Vine".

The middle oval on each pumpkin is popped up on dimensionals (of course), the stems are ribbon pieces, and I made the vines for each with a tiny strip of cardstock.

I updated my Etsy shop this morning, too.  Hop on over to MY ETSY SHOP to view this and the tree cards from yesterday...plus a little more!  Hoping to add a few more things today, too! :)

Well, what do you think?  Do you have a favorite between the two cards?

The Small Print (All Stampin' Up)
Cardstock: Chocolate Chip, Sage Shadow, Whisper White, Very Vanilla
Paper: Autumn Vine DSP
Accessories: Sage Shadow grosgrain ribbon, Large and Small oval punches, Dimensionals

Thanks so much for stopping by, and have a GREAT day! :)
Crystal

Thursday, November 11, 2010

Lovely, Lovely, Lovely

So, I had a friend threaten me with bodily harm if I didn't post to my blog soon. Just kiddin'...kinda, lol. ;-)  Glad to know people out there care whether I post or not! :)

I have a little secret, and it explains where I've been.
I've been working on a project...for a blog I'm going to be featured on!!!  Yup - so excited!! Stay tuned for more info on that!  Anyways, that took a ton of my time, and I was in uber-creative mode and could think beyond nothing but this secret project.

But now I'm back! :)  Here's what I made up today...
featuring our stamp set "Lovely As A Tree"


It was so refreshing to create for fun, again! :)  Look for these cards to appear on my Etsy site, soon!

Want a close up of each LOVELY? ;-)
#1 - Lovely Landscape Trees


#2 - Lovely Tall Tree


#3 - Lovely Maple Tree


I used an old (retired) Stampin' Up Designer Paper called "Juntos" - it was from our Spanish Catalog and I fell in love with it the moment I laid my eyes on it!  The colors I used here are so rich...Chocolate Chip, Always Artichoke, and Very Vanilla. Each main image is up on dimensionals (of course!). :)

Well, what do you think?  Do you have a favorite?

The Small Print (All Stampin' Up)
Stamps: Lovely As A Tree
Ink: Chocolate Chip, Always Artichoke
Cardstock: Chocolate Chip, Always Artichoke, Very Vanilla
Paper: Juntos DSP
Accessories: Chocolate Chip Taffeta ribbon, Dimensionals, SU markers

Thanks so much for stopping by, and have a GREAT day! :)
Crystal

Monday, November 1, 2010

A Thank You Mum

I never buy flowers for myself (consider it an extravagance), but these were so beautiful and bright and cheery and Fall, perfect for my front door! :)  So, when I gave in to that impulse, bought a pot of these beautiful mums, and a few days later found them dead, I was sad. To say the least. ;-)

I was lamenting the fact to my MIL (mother-in-law), and a few days later, what did I find by my front door? Mums!! :)

I knew exactly what I wanted to do on my thank-you card to her:


Okay, so it's not perfect, but I had trouble with one of the layers, lol!  I learned how to make this flower on Stampin' Up's demo-only website - thank you, Diane Dechaine!  I will say it was a little time-consuming, but overall, a pleasant effect during this beautiful Fall season! :)

I wanted the flower to be the focalpoint, so I kept the layout quite simple.  Just a "Thank You" stamp, some layers of Vanilla, Cherry Cobbler and More Mustard cardstock, and some more Cherry Cobbler...this time in the form of ribbon (mini catalog)! :)

Oh...in case you're wondering what's in the middle of the flower...it's coffee grounds. ;-)

Well, what do you think?

The Small Print (All Stampin' Up)
Stamps: Thank You Kindly
Ink: Early Espresso
Cardstock: Very Vanilla, Cherry Cobbler, More Mustard
Accessories: Cherry Cobbler seam binding, Boho Blossoms Punch, Stylus, Stampin' Pastels, Blossom Party Die, Big Shot

Thanks so much for stopping by, and have a GREAT Monday! :)
Crystal

Saturday, October 30, 2010

Etsy Update & PUMPKINS!

Pretty blah title, I know.  Pretty much says it like it is, lol.
*I actually wrote this yesterday*

FIRST - I've spent allllll morning (and into the afternoon) updating my Etsy store, so it'd be great if you make it worth all that work and go check it out. lol! :)  Find something you'd like?  Go ahead...buy it! ;-)

MY ETSY SHOP (craftincrystal)

NOW...for the pumpkins.


I know I've mentioned before that I *heart* watercoloring, but can I just say it again? ;-)  I LOVE WATERCOLORING! :)

Even more so when I use our watercolor paper. (sigh)...love it.

I stamped the front pumpkin, then masked, then stamped the remaining pumpkins, gourd, and leaves.  Then...I got out my trusty aquapainter and ink pad lids and set to work!  The leaves on top of the pumpkins are cut out and I added a linen thread bow, then stamped the sentiment from Grateful Greetings.  Added the layers, and...Voila!

Okay, so this has taken me all day to get to (multiple interruptions)...but it's finally ready to post. Oops, I guess that means this is Saturday's post instead of Friday, lol!.

Well, what do you think?

The Small Print (All Stampin' Up)
Stamps: Autumn Harvest, Grateful Greetings
Ink: Stazon Black, Various ink lids for coloring
Cardstock/Paper: Watercolor paper, Always Artichoke, Cajun Craze, More Mustard
Accessories: Paper snips, Aquapainter, Linen thread

Thanks so much for stopping by, and have a GREAT day! :)
Crystal

Thursday, October 28, 2010

It's My Party

...and I'll Stamp if I want to, Stamp if I want to....
...you would stamp too, if it happened to YOU!

If you were invited to a Stampin' Up party of mine, you'd definitely be stamping something! :)

Below are the two projects the gals did (from start to finish) as free M&T's (Make n Takes):

First, a little treat bag type thing...


Here's the side view:


And now, a Christmas card.


Yes, it's a little early, but this party was instead of my Annual Holiday Open House, so I felt the need to include some Christmas. :)  It's basically the same card, just a flipped sketch. I let the gals decide what they wanted to do, and they also got to choose which stamp for "Merry Christmas."

Want the quick "how to"?  OK...

Thankful Thoughts Treat Holder - Cut out (2) Top Notes with our Big Shot & Top Note die (yep, they got to play with the Big Shot!), Fold bottom of bag downward, then cut bag down to 2 3/4". Attach to (1) of the Top Notes, punch with word window punch.  Decorate 2nd Top Note, then attach on top of bag, Line up and punch with Word Window punch again. Tie with ribbon.
Top Note: Crumb Cake cs
Vines: Baroque Motifs stamped in Old Olive
Pumpkin: Pumpkin Pie cardstock, Wide oval punch, sponged with Pumpkin Pie ink & sponge dauber. Stamped leaf from Autumn Harvest & cut out, Attatched linen thread bow.
Sentiment: Stamped from "Grateful Greetings" in Early Espresso Ink
Handle: Word Window punch, Old Olive grosgrain ribbon

Whew! Maybe it would've been easier to film a video for this one! lol

Merry Christmas Card
Cardstock: Cherry Cobbler, Always Artichoke, Very Vanilla
Designer Paper: Deck the Halls (mini catalog)
Ink: Early Espresso
Accessories: Cherry Cobbler seam binding ribbon, Scalloped oval and Large oval punches, Scallop trim punch, Dimensionals

Well, what do you think?!!  I'm dyin' to know! :)

Thanks so much for stopping by, and have a GREAT day! :)
Crystal

Thursday, September 23, 2010

GCK - Happy Halloween!

Okay, before I get to Day 2 of my GCK (Greeting Card Kids) Series, I need to admit a little something.

I'm not the biggest fan of Halloween (gasp - I know!). I mean, I let the kids dress up in something cute and say "Happy Halloween" to their grandparents and other relatives, but beyond that, I think this is a holiday that can be very dark.

Sorry if I offended anyone, but I feel like I needed to put that out there first. :)

On the flip-side, since I'm doing this series on the Greeting Card Kids, and this (mighty cute) image is a part of that, I felt like it need to be included (even though I'd rather she was a ballerina or something).  I'm actually quite pleased with how it turned out.  Except for ONE thing...read on.

GCK - Happy Halloween!


I just REALLY had a hard time with placement of the sentiment!  I moved it multiple times, multiple places!  AGH!!!  I'm still not incredibly happy with it...love everything else about how the card looks.

Here's the deets: The card base is Basic Black, the next layer is Old Olive run through the Big Shot with the Square Lattice embossing folder. Cut a circle of Rich Razzleberry cardstock out with my Circle Scissors Plus and sponged it with same color ink.  Added some black brads.  Colored the cute lil' pumpkin with my markers and aquapainter.  I also added a splash of color on the 'happy halloween' pieces. :)  Oh. And the main image is up on dimensionals...of course. ;-)

Well, what do you think?  Yesterday's card only received 3 comments -YIKES!  Everyone must be outside enjoying the weather, eh? ;-)

The Small Print (All Stampin' Up)
Stamps: Greeting Card Kids, Teeny Tiny Wishes
Ink: Stazon Black, Rich Razzleberry
Cardstock: Basic Black, Old Olive, Rich Razzleberry, Watercolor
Accessories: Black brads, 5/8" Black grosgrain ribbon, SU markers, Aquapainter, Big Shot, Square Lattice EF, Dimensionals
Techniques: Dry embossing, Watercoloring

Thanks so much for stopping by, and have a GREAT day! :)
Crystal

Wednesday, September 22, 2010

GCK - Back to School!

Well, I'm back today as promised...with a series of cards!

I've labeled this series "GCK" or...Greeting Card Kids!  Each card will feature one of the stamps from the set...a cute lil' set from the catalog that my friend & I like to call "Campbell's Soup Kids." You'll soon see why, lol.

I've had such fun with these - they're so fun to color (watercoloring is my fave way to relax when cardmaking)!

We'll start with Back To School...well, because it just makes sense since that's about the time of year it is right now. ;-)

Day 1 - GCK - Back To School!


I used the Pawsitively Prints II DSP as my starting point. Love the bright cheery colors!

I then watercolored the boy & girl image using my markers and aquapainter....ahhhh...did I mention that I *love* watercoloring?! :)

Mounted it on a piece of Poppy Parade cardstock, added a little scallop border of the same color, and colored my white taffeta ribbon to match. :)  The main image, of course, is mounted up on dimensionals. ;-)

It's a pretty CAS card, I'm itchin' to add a little somethin' to it...to me, it screams "I need a couple of brads!"
Well, what do you think?

The Small Print (All Stampin' Up)
Stamps: Greeting Card Kids
Ink: Black Stazon
Cardstock/Paper: Tempting Turquoise, Poppy Parade, Watercolor, BAB Pawsitively Prints II
Accessories: SU markers, Aquapainter, White taffeta ribbon (colored), Dimensionals
Techniques: Watercoloring

Thanks so much for stopping by, and have a GREAT day! :)
Crystal

Wednesday, November 25, 2009

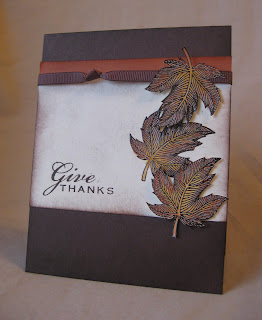
Give Thanks

Tomorrow is Thanksgiving already, can you believe it?

I've decided to post this card today instead of tomorrow...
Because I wanted to start start the mood today...to really take time to reflect on all that I am thankful for.
Will you do the same? :)


I'm really disappointed with this pic...it really doesn't capture the beautiful colors on the leaves, and washes out the very vanilla cardstock color - it's not white, really! :(

Here's a try at a closeup of the leaves, at least...they're embossed, then colored...


Stay tuned - tomorrow I've got a special treat for you!
Please stop by & & check it out! :)

The Small Print (All Stampin' Up)

Stamps: Autumn Splendor, Holiday Best
Cardstock: Chocolate Chip, Really Rust, Very Vanilla
Ink: Chocolate Chip (craft & classic), Really Rust
Accessories: Stampin Sponges, Clear EP, Heat tool, Aquapainter, SU markers, Choc chip ribbon, Dimensionals
Technique: Embossing, Watercoloring


Thanks for stopping by, and have a GREAT day! :)
Crystal

Tuesday, November 24, 2009

Autumn Tree, Simplified

Yesterday, I showed you a Thumping Tree HERE, and promised to show you a simplified version today.

So here it is!  I think you can see the thumping detail even better on this one!


I "thumped" the tree image with SU markers, stamped, then moved a bit of the color around with an Aquapainter.  You could leave it as is after thumping, or move the color around like I did.

The background is merely spritzed with color (SU marker & color spritzer), and the edges sponged.

See, I told you it could be simplified! :)
Well, what do you think?

The Small Print (All Stampin' Up)
Stamps: Lovely As A Tree
Cardstock: Old Olive, Chocolate Chip, Naturals Ivory
Ink: Basic Brown
Accessories: Markers, Color Spritzer, Aquapainter, Sponges
Technique: Thumping


Thanks for stopping by, and have a GREAT day! :)
Crystal

Monday, November 23, 2009

Another Autumn Tree

Sorry for the blogging hiatus...

We were out of town for a few days last week, so I wasn't able to get my daily computer dose in. ;-)

I'm back now, with (hopefully) a treat for you every day this week! :)  The first, is a card I made with one of my GO-TO sets:  "Lovely As A Tree".

I'll bet you're wondering how I made those tree leaves sooo beautiful, am I right? ;-)


By using a technique called "thumping."  SERIOUSLY.
Using my Stampin' Up markers.
Let me know if you'd like a tutorial.

A little sponging here & there, and voila!  You have your card!
Complete with top note die cut from SU's Sizzix die!
I love how it could really be a card for most any occasion! :)

Tomorrow, I'll show you a toned-down, simplified version.  I know...how could it get any more simplified?!!  lol...you'll see. :)

The Small Print (All Stampin' Up)
Stamps: Lovely As A Tree, Sincere Salutations, Linen BG
Cardstock: Old Olive, Chocolate Chip, Very Vanilla
Ink: Basic Brown
Accessories: SU markers, Aquapainter, Sponges, Sizzix, Top Note Die, Chocolate chip ribbon
Technique: Thumping, Sponging


Thanks for stopping by, and have a GREAT day! :)
Crystal

Friday, November 6, 2009

Fall Leaves...to stay!

Remember a few posts ago...HERE
I was lamenting the fact that the beautiful Autumn
leaves were falling to the ground?

Well, I found a way around that. ;-)

I made a card - a tree card!
WITH the leaves on...well mostly, anyways. ;-)
Granted, it's NOT as beautiful as the real thing, but it'll do. :)

A view from the side...do you see a little something extra?:


How bout if I go a little closer...do you see the sparkle?  FUN!


I embossed the craft ink with Irridescent Ice Embossing powder (SU) here & there.
Gives it a little somethin' extra dontcha think? :)

Oh, you're not a ribbon kind of person?
No problem...I made for you, too!
I also omitted the stamping around the edges, and sponged a little more. :)


The Small Print (All Stampin' Up!)
Stamps: Branch Out
Cardstock: Soft Suede, Dusty Durango, Very Vanilla
Ink: Soft Suede, Dusty Durango, Earth Elements Craft inks
Accessories: Irridescent Ice EP, Heat tool, Dimensionals, Soft suede ribbon, Stampin' Sponge
Technique: Embossing

Which one do YOU like best?

Thanks for stopping by, and have a GREAT day! :)
Crystal